2·
10 hours agoI am not aware of any USB-PD power banks that take AA’s. The idea behind my comment was “you don’t have to worry too much about availability of OE batteries”.
I am not aware of any USB-PD power banks that take AA’s. The idea behind my comment was “you don’t have to worry too much about availability of OE batteries”.

If heavy duty means “lets you carry more weight in your bed and tow more” do not do it unless you actually have weight in your bed or tow a lot. To do this, the springs have a higher spring rate which makes the ride very hard unless you’re loaded.
DSLRs all have optical viewfinders, since the SLR bit basically means “uses a mirror and a pentaprism for the viewfinder”.
Most digital interchangeable lens digital that I know of use proprietary form factor lithium batteries. Lithium is a lot more energy dense than an alkaline battery and are rechargeable. They also offer much more stable voltage as the battery discharges, which probably makes them more attractive to camera OEMs.
Why shy away from lithium packs? Even for my ancient D40 I can still get new, but aftermarket, batteries.
Most newer cameras can charge the battery in the body without removing it. Some even support USB-PD and can be externally powered indefinitely.
A number of newer cameras also support USB-PD. I’m sure there’s some devil in the detail here, but you should be able to run them connected to a PD rated power bank indefinitely.
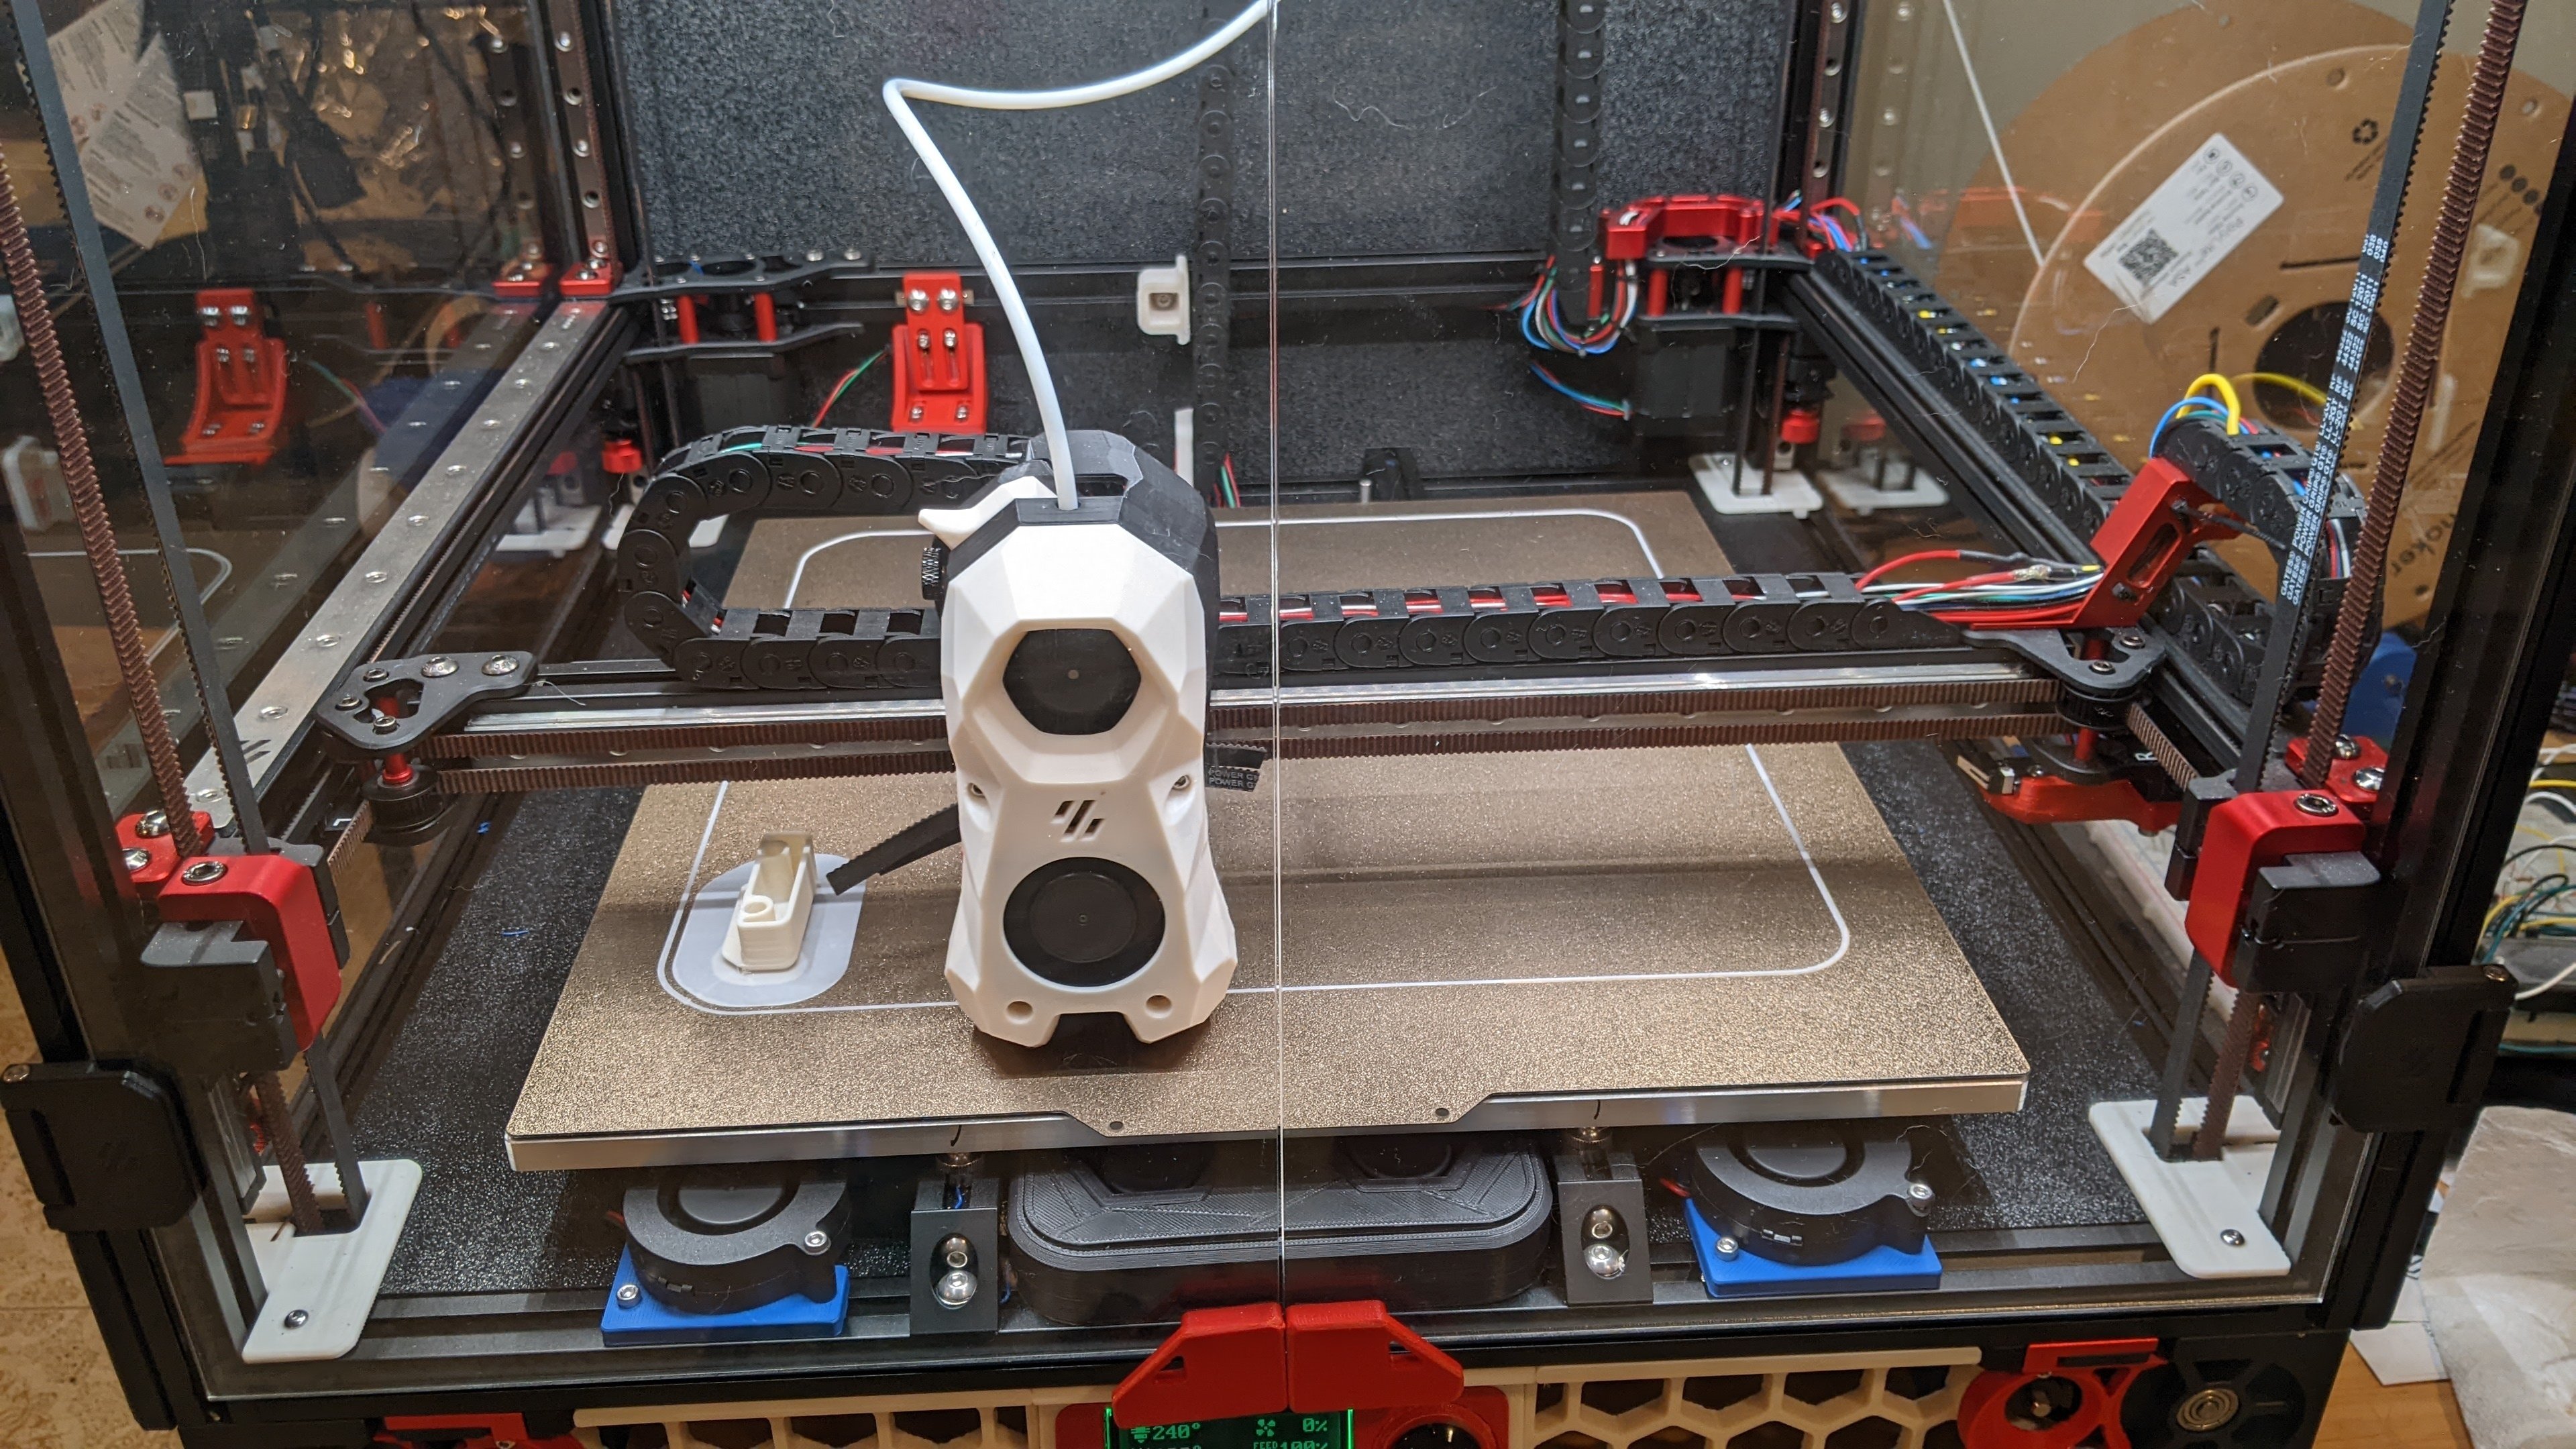
Huh, any particular ABS brand(s)? I am tempted to grab a roll. I’ve been running polymaker’s ASA and other than warpage on big parts with my lower chamber temps (yay big printer with lots of enclosure surface area) it prints fairly well.
I run the filter inside an enclosed printer with an exhaust fan.
You’re saying ABS is printing easier for you than ASA? That’s interesting. From my limited understanding, ASA has the reputation of being easier to print.
What brands/blends? I’ve been printing basically only ASA and PETG for a little while now. Haven’t tried ABS.
Yeah, I sent my A9 off for surgery - https://www.lifepixel.com/photography-gear/anti-aliasing-low-pass-filter-removal 😄
That’s pretty cool, the thought hadn’t crossed my mind previously. $350 seems a bit steep, but now I’m not going to be able to unsee this.
I think my initial “yuck” with the OM-1 was the 12-24 just taking bright landscape shots … everything looked, muddy.
I briefly shot the A9II and the OM-1 back to back again and sold the OM-1 to MPB :( Probably for the best long term, but it was a tough decision due to my lack of adoration for the A9II. I do greatly appreciate what it can do, I just don’t love it. The results do speak for themselves and the A9II’s tracking AF is just so easy to use.
And yes, with my 200-600G, monopod is a minimum, tripod if I know I’ll be stationary. Handheld is practically never, but I have in a pinch and with sufficient bracing, and for just one subject (before it flies or runs away typically), I can manage. And I’m only 44 😄 … hoping I can keep using it for another 10 years or so at least!
I’m 38 here, but even if you’re young and very athletic, holding 5-6 pounds in front of your face for an extended period of time still isn’t pleasant - especially if you’re not doing it frequently enough to build those muscles. What about the 200-600 puts you off, especially if you’re using a monopod?
I only use that for wildlife though … for the odd recital or what have you the boy has, I bring the 70-200G with the 2x TC.
No reticles or indoor sports here (yet?), but the 70-200GM does look like a very nice lens! So far I’ve been stubbornly sticking with primes for days I’m not doing sports photography, but the idea of a zoom with a touch more reach is kind of appealing. I’ve been circling the 70-200 F2.8 along with the F4 and F4 ii (quasi macro!) and Tamron’s 28-200. For whatever reason, a normal zoom doesn’t really appeal to me - I’m totally happy using my feet and know to bring a 35 with me if I’m going to be in a tighter space.
100% agreed about “the one you’re carrying”, which is why I haven’t actually put much money into anything lately - I do about 90% on my Xiaomi 13 Ultra, with a 1" sensor like was in my FZ-1000. I find I only use my big expensive gear when I actually go out to “do photography”, which is pretty rare these days. My son is 14 now too, so there’s way less recitals and games and events and such for me to shoot.
I guess I’m lucky in that my kids are younger and we are fortunate enough to be able to afford to be members at a couple of local attractions. Between visiting those places and going to parks, I’m out with the camera most weekends.
Groggy day today here for me, so a slightly rambley and discombobulated response, but, as I’ve typed it, I’d might as well post it now :-)
All good, I also tend to be a bit verbose so cheers!
I sold the OM-1 today :( it was hard to pack up the two lenses especially, they feel very nice on hand. The A7III and A9II are not always responsive, especially when turning on, but man are they easier for me to chase my kids around with. I also sold the A7III. The A9II with a compact prime like Sigma’s i series is actually more compact than the OM-1 with one of the 1.2 pros.
If you’re willing to give Sony a shot, the OG A9 is worth a look. The A9II has the same sensor and the A9 has had a ton of firmware updates that put its AF performance on par with the A9II. The biggest differences I remember are the buttons (they feel slightly nicer on the A9II) and the addition of an Ethernet port.
The perfect bag can be a never-ending quest. Good luck!
It will decompose, but only it a hot compost pile.
To some extent, this means large scale composting, but you could theoretically do it at home if you live somewhere with four seasons (specifically fall) and have trees that drop leaves on your property or nearby. Let your grass get a bit taller as the trees start turning and mulch/bag the grass and leaf mixture. Bonus points if you have a ratio of 30 carbon (brown stuff) to 1 nitrogen (green stuff) by weight. “Normal” composting into. This is why big piles of fresh mulch get pretty warm and stream in the middle.
I don’t know what it would take to break down PLA in compost, but suspect it would take more time than a typical home pile if you manage to get it hot. It would probably be benefit from shredding to speed things up, as would the rest of the stuff in a typical compost pile. Amusingly, your PLA is probably ripe for getting whacked with a hammer, or a hammer mill.
It’s great that you’re trying to carry your camera more often, presumably so you can use it. The only thing to keep in mind is that a buried camera will be hard to get your hands on. It might be worth considering a multi-chamber backpack at some point in the future.
Examples include Lowpro’s fast pack and a whole bunch of Amazon brands.
IMO there’s little need to buy new in the computer world unless you want to do something silly like have a snapdragon x laptop or have the disposable funds to go the gaming rig route.
My desktop is a retired business workstation, a HP Z420. I bought it for $250, installed a smaller SSD ($100 new) for the OS + apps, upgeaded to the “best” Xenon that fit the socket ($150 used), upgraded to 64 GB RAM ($107 used, yay ECC memory being dirt cheap on the used market), and a 1070TI ($225 used, purchased just before covid).
It’s more than fast enough for my needs still.
This was all about 4-5 years ago, so you could probably do even better with more modern hardware.

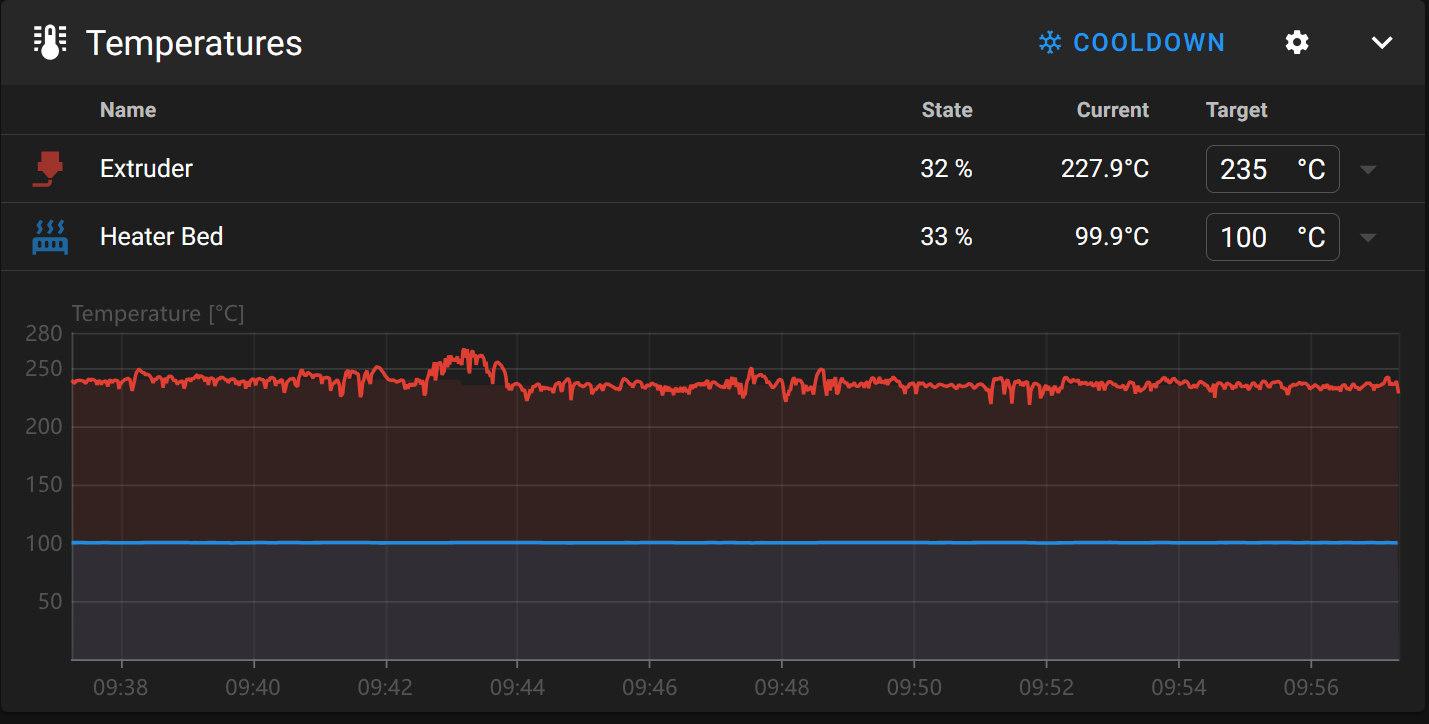
That looks like under-extrusion to me.
Here’s the quick “tune your extruder” arc:
After you get #1, never touch it again unless you change things like your extruder gears. #2/#3 are a good idea whenever you start a new roll of filament, although I personally don’t bother unless I’m trying a new material, brand, or color.
If you’re “squashing” the camera on the hot shoe and base plate, you’re probably fine. Especially given that your backpack probably won’t be able to fit that much stuff besides the camera cube and your laptop.
Just keep weight off the lens/lens mount. It will be a lever and you don’t want to tweak anything.
The PWM signal once it starts getting jittery is basically only 0 or 100% and corresponds pretty well to the swings in temperature.
I’ve moved the head hot and cold by hand and haven’t gotten any weird behavior. Normally when I have a wire break there’s a very specific location that will reliably fail. That’s not the case this time.
I wouldn’t think so, the printer never did this previously. I need to put together some g-code to make the print head move around at a pretty high rate, but without actually extruding anything.
That’s the thing, I would say that the OM-1 is capable of delivering very sharp and low noise photos. Potentially even sharper than the A9II, due to either the OM-1 having a less strong AA filter than the A9II or my choice of glass on both bodies (first party ‘pro’ on the OM-1, third party and cheap first party on the A9II). You can see this in things like the shirts my kid wear - the stitching around the collars and seams, and even the weave of the shirts tends, to pop a bit more in the OM-1 photos.
The really frustrating thing with the OM-1 is that I know it can deliver very sharp photos. And yet it doesn’t do so fairly often because its focus system holds it back. Some of this might be due to brand philosophy. Set the A9II to focus priority and it will drop its burst rate to ensure every shot is in focus. Do the same on the OM-1 and the burst rate stays pretty high, resulting in more total shots but also more shots out of focus. I’ve done some sleuthing by wiring my phone up to the OM-1’s HDMI output and recording it focusing, and it seems like the AF algorithm will falsely claim focus. The thing behind the green focus box isn’t in focus and the camera’s green focus dot claims that focus has been achieved. This is something I do not see happen very often on either the A7III or A9II. Those two cameras very reliably indicate what they’re focusing on. If the green focus indicator isn’t where you want it, simply reacquire focus. On the OM-1, you have to judge both the focus indicator, as well as whether or not your intended subject is actually in focus.
I suspect I could work harder on the OM-1 to get better focus more consistently, but the A9II, and the A7III, are just so easy that I’m spoiled.
If you’re pushing ISO, the FF gear will obviously come out ahead. Thankfully, I rarely need to push ISO.
As for croppability, I’ve done some decent crops with the OM-1. If you look over in !beebutts@lemmy.world you’ll see a lot of cropped OM-1 bee photos that I’ve posted. Crop and pixel peep? On a high resolution display without exceeding 100% zoom, sure. On a lower resolution screen, maybe not so much. Prints shouldn’t be an issue unless you’re going to do a heavy crop and then print large.
As for weight, if you’re taking photos in the ‘normal’ focal length range and want shallower depth of field FF really is pretty competitive these days. Especially if you like primes. M43s do have very compact glass, but their FF equivalent f-stops are pretty high so I’ve found myself gravitating to fast M43 glass. It’s the telephoto end that M43 wins on. I could happily hand hold my D5300 + 70-300 (FF glass, but only 745 grams - half the weight of my 150-500) for hours on end. With the A9II and the 150-500, I find myself squatting/sitting and bracing my left arm against my leg, especially when I’m shooting baseball and my kid’s team is batting - I’m just sitting at the end of the fence bursting every time a pitch comes to try to get a good photo of each kid making ball contact. Lots of ‘ready position’.
If I were approaching the age where weight was really an issue, and I was mostly focused on wildlife with longer glass, I would go the monopod route. I’ve been avoiding one at my kid’s sports events due to wanting to keep a (somewhat) low profile. The 150-500 is still a pretty beefy lens though and now that my oldest is in coach pitch some of the kids are taking more notice. One even asked me if they were going to be in the news, lol. Sony’s 200-600 would probably be easier to handle, thanks to its super easy zoom action, but that lens is big. At least with the 150-500 I can walk past the stands fully zoomed out and locked in place.
Final thought: the best camera in the world is the one you’re carrying. If you’re not hesitating to grab the A91 then keep rocking it. If you’re hesitating, maybe consider going the M43 route. As for me? I continue to waffle. For daily use in the normal range, it’s the A9II with a prime hands down. I am tempted to sit on the OM-1 until this summer and rent/buy a used Panasonic 100-400 to see how it does. I’ll be using it mostly in the 100-250mm range, so it should be plenty sharp. But do I really want to have the $$ tied up in two bodies…
I suspect it’s motion/jiggling around related. I guess I could whip up some g-code to see what happens when the printer is still vs when it’s moving rapidly.
Thanks for the nudge, will follow up.
Great question, it really hits at the heart of my struggle. If you read between the lines of my post, it’s clear that I think more highly of the Sony. So why am I waffling? Why write a wall of text?
I haven’t been able to put my finger on it, but I just don’t love the Sony. It’s a very technically capable camera, its ecosystem is great, and it does disappear pretty effectively when you’re using it. I don’t hesitate to bring it with my on a family outing. In fact, I use it way more often than I used any other prior camera.
Maybe it’s the ergonomics. The OM-1, and the Z6II for that matter, have a more comfortable grip and feel somewhat better in hand. They also have more accessible control surfaces that you can use without taking your eye off the EVF. An example includes the two buttons on the front of the body by the lens mount.
Maybe it’s the responsiveness of the camera. The Sony is certainly a fast camera, but the OM-1 always turns on immediately. It will also blaze away at taking photos and seems to do so just a touch faster, granted I’m using third party glass on the Sony.
All that said, the Sony is just so easy to get great results with. I was messing around with the OM-1 and A9II yesterday while my kids were building legos. My youngest held their creation up after they completed every step, often in front of their face, and the OM-1 would consistently choose to focus on the lego. The A9II on the other hand stayed laser focused on his face much more consistently with its tracking AF.
Although my heart isn’t really in camp Sony, at the end of the day it’s probably better to have a reliable dance partner that you work well with than a drop dead gorgeous dance partner that steps on your toes.
ASA is a bit more audible than PETG, but PETG prints would also become very lose once my bed was cooled down.